Patellar Tendinopathy - a guide for patients

Warning

NHS Borders

For further advice and self care information you can:

Visit: www.nhsinform.scot/msk
Download: ‘MSK Help’ app free from app stores
Phone: the Musculoskeletal Advice and Triage Service on 0800 917 9390

"Information given on this site is not meant to take the place of a talk with your doctor or health worker."

What is patellar tendinopathy?

Patellar tendinopathy is commonly referred to as “jumper’s knee” and is a painful condition affecting the tendon underneath the kneecap. It happens when the tendon becomes irritated and inflamed, usually due to overloading causing increased stress on the tendon.

What are the symptoms of patellar tendinopathy?

  • Pain beneath your kneecap
  • Swelling beneath or on top of the kneecap
  • Pain increases on squatting, and going down hills and stairs

You don’t normally need a scan to diagnose this problem and a health care professional will make a diagnosis from a history and specific tests.

What Causes patellar tendinopathy?

It is more common between your teens and thirties, however can happen at any age. Some things that might contribute are:

  • Increased or excessive load, like lots of walking or running downhill
  • Weakness in the quadriceps (anterior thigh muscle) +/- the buttock muscles
  • Repetitive activity such as squatting or jumping

How is patellar tendinopathy managed?

To try and reduce the pain in the short term, try the following:

  • Ice the painful area for 10-15 minutes 2-3 times per day. Ensure ice is not applied directly to skin (use a towel around the ice pack)
  • Try to reduce all the aggravating activities like running, jumping, excessive walking and hill walking
  • Liaise with your local pharmacist about what pain relief is most suitable for you
  • Look into investing in a “Jumper’s knee” support to help offload the kneecap. These can be found online on in your local pharmacy and come with easy to fit instructions

Exercises

The following exercises are for the early and later stages of your rehabilitation. It is important to follow the instructions and monitor how you are doing. Load is needed to aid recovery but overload may worsen your pain.

Try to work at a level no higher than 2 on the below scale with the exercises and general physical activity.
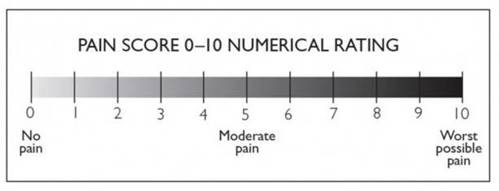
1. Exercises for early stages

  • Lying on your back on your bed or the floor, with knees bent and feet on the surface. Tighten your buttock muscles, and slowly lift your bottom up, and slowly lower back down.
  • Perform 3 sets of 10 repetitions.
  • Lying on your back on your bed or floor with straight legs. Tighten your thigh muscles, pushing the backs of your knees down into the bed/ floor.
  • Hold for a count of 5 seconds. Relax. Perform 3 sets of 10 repetitions.

When the previous exercise is pain free, move on to this one.

  • Sitting in a chair with support at your lower back. Straighten your affected leg out in front, straightening the knee and toes pointing up towards the ceiling. Hold for 5s.
  • Perform 3 sets of 10 repetitions.

  • Lie on your unaffected side. Make sure your top leg is in line with your body. Lift the leg up towards the ceiling and slowly lower back to the starting position.
  • Perform 3 sets of 10 repetitions.

2. Exercises for later stages

  • Stand with your back against the wall, with feet hip width apart and away from the wall. Slowly slide down the wall as far as you are comfortable. Then slowly push back up again. Perform 3 sets of 10 repetitions.
  • Once this is entirely comfortable, do this without the support of the wall.

  • Once the previous exercise is pain-free, try this with one leg. Stand on your affected leg, letting the knee bend as far as comfortable.
  • Then place your unaffected leg on the floor, pushing back up straight. Perform 3 sets of 10 repetitions.


Editorial Information

Last reviewed: 01/11/2024

Next review date: 01/11/2024

Author(s): Murray J.

Approved By: Clinical Governance & Quality

Reviewer name(s): Murray J.